大约 7 分钟
ES7.4.1搭建
ES统一采用7.4.1版本
ES的Docker镜像部署
Docker的安装这里不再赘述
单节点部署
vi docker-compose-es-single-node.yml
version: "2"
services:
  es-single-node:
	image: elasticsearch:7.4.1
	container_name: es-single-node
	environment:
	  - node.name=es-single-node
	  - cluster.name=es-cluster
	  - cluster.initial_master_nodes=es-single-node
	  - discovery.seed_hosts=es-single-node
	  - discovery.zen.minimum_master_nodes=1
	  - node.master=true
	  - node.data=true
	  - http.port=9200
	  - transport.tcp.port=9300
	  - http.cors.enabled=true
	  - http.cors.allow-origin="*"
	  - "ES_JAVA_OPTS=-Xms128m -Xmx128m"
	ports:
	  - 9210:9200
	  - 9310:9300
docker-compose -f docker-compose-es-single-node.yml up -d (这个步骤也可以用docker的界面管理工具portainer完成)
多节点部署
这里演示2个master2个data节点的配置,增加删除节点依葫芦画瓢即可
vi docker-compose-2master2data.yml
version: "2"
services:
  master01:
	image: elasticsearch:7.4.1
	container_name: master01
	environment:
	  - node.name=master01
	  - cluster.name=es-cluster
	  - cluster.initial_master_nodes=master01,master02
	  - discovery.seed_hosts=master01,master02,data01,data02
	  - discovery.zen.minimum_master_nodes=2
	  - node.master=true
	  - node.data=false
	  - http.port=9200
	  - transport.tcp.port=9300
	  - http.cors.enabled=true
	  - http.cors.allow-origin="*"
	  - "ES_JAVA_OPTS=-Xms128m -Xmx128m"
	ports:
	  - 9200:9200
	  - 9300:9300
  master02:
	image: elasticsearch:7.4.1
	container_name: master02
	environment:
	  - node.name=master02
	  - cluster.name=es-cluster
	  - cluster.initial_master_nodes=master01,master02
	  - discovery.seed_hosts=master01,master02,data01,data02
	  - discovery.zen.minimum_master_nodes=2
	  - node.master=true
	  - node.data=false
	  - http.port=9200
	  - transport.tcp.port=9300
	  - http.cors.enabled=true
	  - http.cors.allow-origin="*"
	  - "ES_JAVA_OPTS=-Xms128m -Xmx128m"
	ulimits:
	  memlock:
		soft: -1
		hard: -1
	ports:
	  - 9201:9200
	  - 9301:9300
  data01:
	image: elasticsearch:7.4.1
	container_name: data01
	environment:
	  - node.name=data01
	  - cluster.name=es-cluster
	  - cluster.initial_master_nodes=master01,master02
	  - discovery.seed_hosts=master01,master02,data01,data02
	  - discovery.zen.minimum_master_nodes=2
	  - node.master=false
	  - node.data=true
	  - http.port=9200
	  - transport.tcp.port=9300
	  - http.cors.enabled=true
	  - http.cors.allow-origin="*"
	  - "ES_JAVA_OPTS=-Xms128m -Xmx128m"
	ulimits:
	  memlock:
		soft: -1
		hard: -1
	ports:
	  - 9202:9200
	  - 9302:9300
  data02:
	image: elasticsearch:7.4.1
	container_name: data02
	environment:
	  - node.name=data02
	  - cluster.name=es-cluster
	  - cluster.initial_master_nodes=master01,master02
	  - discovery.seed_hosts=master01,master02,data01,data02
	  - discovery.zen.minimum_master_nodes=2
	  - node.master=false
	  - node.data=true
	  - http.port=9200
	  - transport.tcp.port=9300
	  - http.cors.enabled=true
	  - http.cors.allow-origin="*"
	  - "ES_JAVA_OPTS=-Xms128m -Xmx128m"
	ulimits:
	  memlock:
		soft: -1
		hard: -1
	ports:
	  - 9203:9200
	  - 9303:9300
  kibana:
	image: kibana:7.4.1
	environment:
	  - ELASTICSEARCH_HOSTS=["http://master01:9200","http://master02:9200","http://data01:9200","http://data02:9200"]
	ports:
	  - 5601:5601
docker-compose -f docker-compose-2master2data.yml up -d
Centos部署
单节点部署
- 下载es7.4.1安装文件到服务器并解压到 /usr/share/elasticsearch 目录,然后已root用户执行:
echo "* soft nofile 125536" >> /etc/security/limits.conf echo "* hard nofile 125536" >> /etc/security/limits.conf echo "* soft nproc 8096" >> /etc/security/limits.conf echo "* hard nproc 8096" >> /etc/security/limits.conf echo "* soft memlock unlimited" >> /etc/security/limits.conf echo "* hard memlock unlimited" >> /etc/security/limits.conf echo "vm.max_map_count=522144" >> /etc/sysctl.conf sysctl -p adduser elastic chown -R elastic:elastic /usr/share/elasticsearch - 修改elasticsearch.yml,可参考下面的配置
# 这两个配置都写master节点的ip cluster.initial_master_nodes: ["192.168.1.55"] discovery.seed_hosts: ["192.168.1.55"] # 节点名称,其余两个节点分别为node-ip # 节点名称以node-开头,以当前节点IP结尾 node.name: master192.168.1.55 discovery.zen.minimum_master_nodes: 1 # 指定该节点是否有资格被选举成为master节点,默认是true,es是默认集群中的第一台机器为master,如果这台机挂了就会重新选举master node.master: true # 允许该节点存储数据(默认开启) node.data: true # 绑定的ip地址 network.host: 0.0.0.0 # 集群的名称 cluster.name: xxxxx-dssa # 索引数据的存储路径 path.data: data # 日志文件的存储路径 path.logs: logs # 快照仓库路径 path.repo: ["/opt/xxxxx/backups/es_repo","/opt/xxxxx/backups/rsyslog-audit","/opt/xxxxx/backups/rsyslog-firewall","/opt/xxxxx/backups/rsyslog-desens","/opt/xxxxx/backups/rsyslog-encrypt"] # 正式部署需要设置为true来锁住内存。因为内存交换到磁盘对服务器性能来说是致命的,当jvm开始swapping时es的效率会降低,所以要保证它不swap bootstrap.memory_lock: true # 设置对外服务的http端口,默认为9200 http.port: 9200 # 设置节点间交互的tcp端口,默认是9300 transport.tcp.port: 9300 # 如果没有足够大的内存,因为了elasticsearch引用文件,系统内存会大量用于系统cache(linux的内存管理机制)。 # 由于系统cache释放缓慢,而导致这个过程非常长,这有可能使你的节点GC非常频繁,从而导致集群不稳定。 # 建议把bootstrap.mlockall设为true # 这个参数在7.4.1无效 # bootstrap.mlockall: true # 开启跨域访问 http.cors.enabled: true http.cors.allow-origin: "*" - 修改jvm.options,一般把Xms Xmx内存配置为可用内存的一半
- 尝试启动观察日志看看有没有问题
su elastic cd /usr/share/elasticsearch bin/elasticsearch 前台执行 bin/elasticsearch 后台执行,需要到配置的日志目录去看日志 - 开机启动
- vi /usr/lib/systemd/system/elasticsearch.service 输入如下内容:
[Unit] Description=elasticsearch service [Service] User=elastic ExecStart=/usr/share/elasticsearch/bin/elasticsearch [Install] WantedBy=multi-user.target- systemctl enable elasticsearch (开机启动)
- systemctl restart elasticsearch (重启es)
多节点部署
多节点部署和单节点部署几乎一模一样,只需要根据自身要搭建的集群节点规划修改下配置文件即可
一般修改如下几个配置:
cluster.initial_master_nodes: ["master01","master02"]
discovery.seed_hosts: ["master01","master02","data01","data02"]

node.name: 节点的名字

# 计算公式是这样的: master候选节点的个数/2 + 1,设置不恰当可能存在脑裂问题
discovery.zen.minimum_master_nodes: 2

# 指定该节点是否有资格被选举成为master节点,默认是true,es是默认集群中的第一台机器为master,如果这台机挂了就会重新选举master
node.master: true

# 允许该节点存储数据(默认开启)
node.data: true
ESRally
esrally是es官方提供的对es进行性能测试的工具 官网:https://esrally.readthedocs.io/en/stable/quickstart.html
esrally安装
直接拉取docker镜像即可:

1. 修改host文件,添加如下配置
172.16.1.201 prod.docker
172.16.1.201 dev.docker

2. 修改docker配置文件,增加如下配置:
 { "insecure-registries": ["prod.docker:8085", "dev.docker:8085"] }

3. 拉取docker esrally镜像
docker pull dev.docker:8085/elastic/rally:2.0.0

4. 执行测试
docker run --rm -i -v /opt/esrally:/opt/esrally dev.docker:8085/elastic/rally:2.0.0  --pipeline=benchmark-only --track-path=/opt/esrally --target-hosts=192.168.1.55:9200

准备es的索引模板
在 tfs 中已经准备了几个我们生产环境使用的es索引模板,可根据自身情况自行修改

由于索引模板是yml格式的,需要转换为json格式:通过修改index.sh中的相关参数并执行index.sh即可完成json转换。
index.sh完成了两个动作(可根据自身情况自行删除): - yml转换为json - 连接es创建索引
准备测试数据
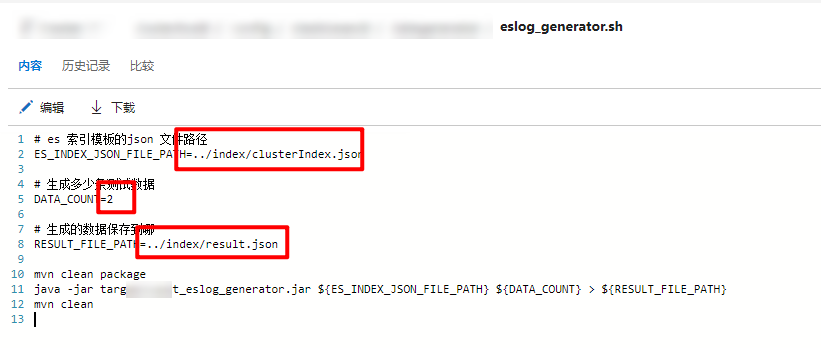
在tfs中也已经准备好了生成测试数据的工具

只需要修改eslog_generator.sh中的三个参数即可根据索引模板生产测试数据
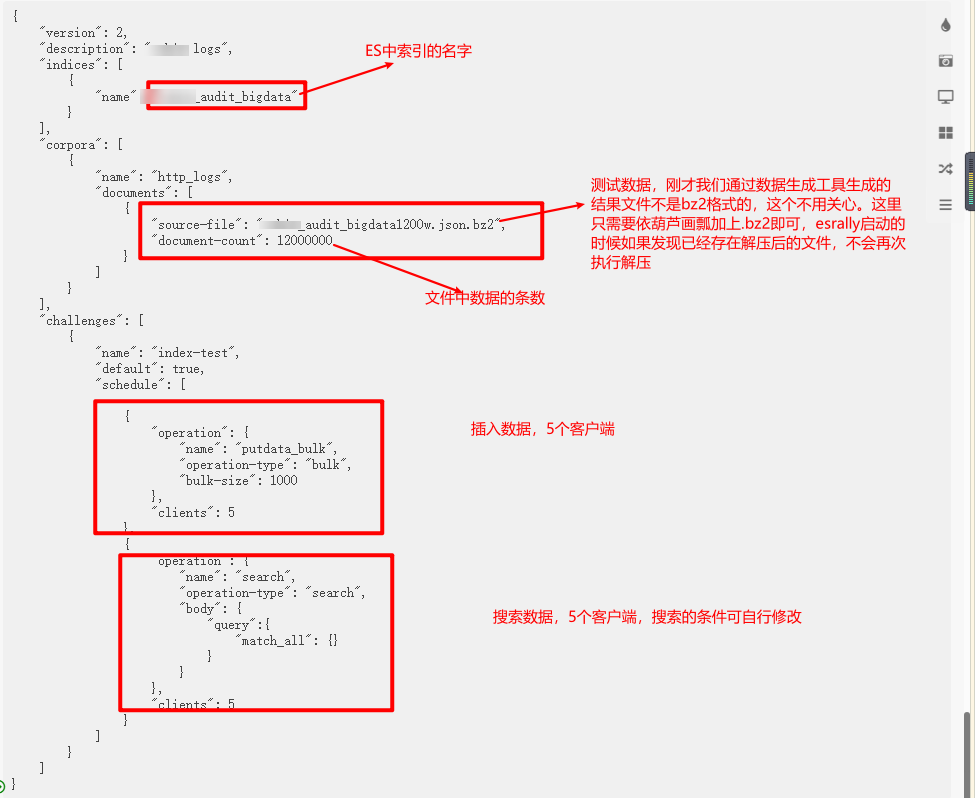
编辑track.json文件
这个文件是esrally需要使用的,可参考:
{
    "version": 2,
    "description": "xxxxx logs",
    "indices": [
        {
            "name": "xxxxx_audit_bigdata"
        }
    ],
    "corpora": [
        {
            "name": "http_logs",
            "documents": [
                {
                    "source-file": "xxxxx_audit_bigdata1200w.json.bz2",
                    "document-count": 12000000,
					"uncompressed-bytes": 30760
                }
            ]
        }
    ],
    "challenges": [
        {
            "name": "index-test",
            "default": true,
            "schedule": [

              	{
                    "operation": {
                        "name": "putdata_bulk",
                        "operation-type": "bulk",
                        "bulk-size": 1000
                    },
                    "clients": 5
                },
                {
                    "operation": {
                        "name": "search",
                        "operation-type": "search",
                        "body": {
                            "query":{
                                "match_all": {}
                            }
                        }
                    },
                    "clients": 5
                }
            ]
        }
    ]
}

执行
track.json文件和生成的数据文件要放在同一个目录,假设为 /opt/esrally/track,则执行
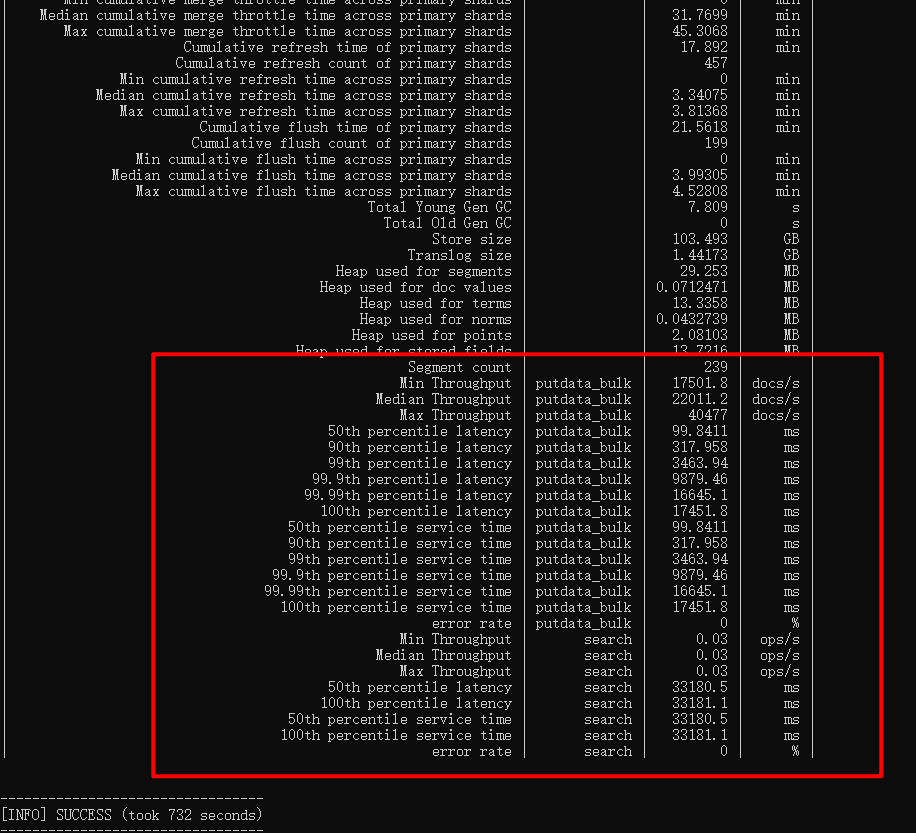
esrally race --pipeline=benchmark-only --track-path=/opt/esrally/track --target-hosts=esip:9200
执行完成会有下面的一个结果输出

系统推荐
- RSA 加密解密多语言实现方案
- 常见问题
- Spring Cloud Gateway收到的是http请求,但schema却是https
- 各种网关性能测试
- JDK命令行工具
- K8S 无感发布
- 乱七八糟的笔记
- MySQL锁、事务、隔离级别
- Flutter开发需要涉及的知识点大纲
- vuepress-theme-hope使用心得
- vuepress-theme-hope 添加谷歌广告
- Linux dev shm目录
- 随机毒鸡汤:这世上只有和好,没有如初。

